Adoption to Rich Internet Applications is increasing. What about the products which were developed earlier and are not RIAs? how will they adopt RIA? It’s very simple. If your software has a architecture where the business logic is clearly separated from other layers, then you just have to start learning Adobe Flex and develop and RIA. Because Adobe Flex allows us to invoke Java objects on the server from the client side Flex application.
How to invoke Java methods from Flex application?
- Add an mapping to the Java class to services-config.xml
- Map your RemoteObject (provided with Flex SDK) on the client side to the destination configured in services-config.xml
- Invoke the method in your Java class using the RemoteObject instance
What do you need to invoke a Java method from the client side application?
- Flex Builder
- Blaze DS
Isn’t that simple? Let’s get into details of implementing this.
Set up Blaze DS
Download and setup Blaze DS on your system from http://labs.adobe.com/technologies/blazeds/
You will be downloading Blaze DS with integrated Tomcat server. You just have to start the server by executing startup.bat under tomcat/bin. Please note the port number in which the Tomcat server is running. The port number mentioned below might have to be replaced with yours, if required.
Creating Java class
Create the Java class with the code below and compile it. We should deploy this class in a location, where Blaze DS can find and instantiate this class. Under the folder where the Blaze DS zip file was extracted, navigate to tomcat/webapps/blazeds/WEB-INF/classes and then copy the Java class in appropriate directory structure.
RemoteServiceHandler.java
package com.adobe.remoteobjects;
import java.util.Date;
public class RemoteServiceHandler {
public RemoteServiceHandler()
{
//This is required for the Blaze DS to instantiate the class
}
public String getResults(String name)
{
String result = null;
result = “Hi ” + name + “, this is a service and the time now is : ” + new Date();
return result;
}
}
Creating Flex application
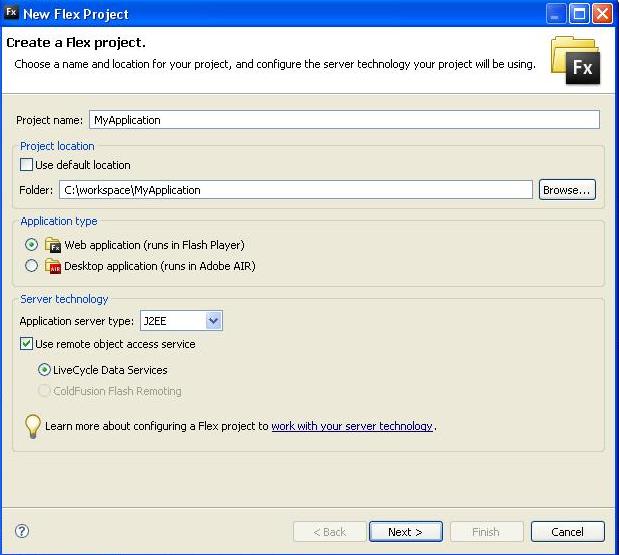
Using the Flex Builder select File -> New -> Flex Project. Create new Flex project window will be displayed. Give your application name and other details. Select the Application Server type to J2EE. Please find the screen shot of the window I filled while developing.
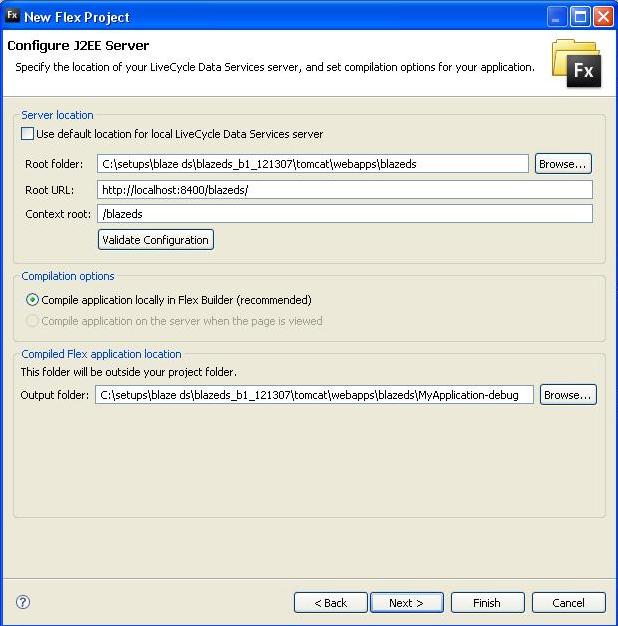
Click Next and then Server Configuration window will be displayed. Modify the values in this window to reflect the paths in your system. Please find the sample values in the image below. Select the output folder properly so that the Flex application is compiled directly into the Tomcat web application directory.
Once this is done continue with the project creation setup and complete it.
Code to be included in the MXML file to invoke the Java class on the server is available below.
In the RemoteObject, the value of the destination property should be set to the ID of the destination, which will be added to the configuration file (Explained below).
MyApplication.mxml
<?xml version=”1.0″ encoding=”utf-8″?>
<mx:Application xmlns:mx=”http://www.adobe.com/2006/mxml” layout=”vertical”>
<mx:Script>
<![CDATA[
import mx.controls.Alert;
]]>
</mx:Script>
<mx:RemoteObject id=”remObj”
destination=”CreatingRpc”
result=”Alert.show(event.result.toString());”
fault=”Alert.show(event.fault.faultString);”
/>
<mx:Button id=”remoteService” label=”Remote Service” click=”remObj.getResults(’Sujit’);”/>
</mx:Application>
This application has been configured to compile the output to the tomcat web application folder. Now that we have done developing the files required on both the client and the server. We need to configure Blaze DS.
Configuring Blaze DS
Navigate to tomcat/webapps/blazeds/WEB-INF/flex and open the file remote-config.xml. Replace the XML file content with the content below. The ID of the destination added below will be used by the components at the client side. Destination added will be map the destination name to the Java class, which has to be invoked.
remote-config.xml
<?xml version=”1.0″ encoding=”UTF-8″?>
<service id=”remoting-service”
class=”flex.messaging.services.RemotingService”>
<adapters>
<adapter-definition id=”java-object” class=”flex.messaging.services.remoting.adapters.JavaAdapter” default=”true”/>
</adapters>
<default-channels>
<channel ref=”my-amf”/>
</default-channels>
<destination id=”CreatingRpc”>
<properties>
<source>com.adobe.remoteobjects.RemoteServiceHandler</source>
<scope>application</scope>
</properties>
<adapter ref=”java-object”/>
</destination>
</service>
Executing the application
Start the Tomcat server. Navigate to http://localhost:8400/blazeds/MyApplication-debug/MyApplication.html in your browser. Click on the Remote Service button and then you can see the message from the Java class. Find the snapshot of the application displaying the response from the Java class below.

0 comments:
Post a Comment